
Navigation isn’t about getting lost and then trying to figure out where you are. (Although sometimes that happens.)
 |
Navigation is about systematically using the tools at hand to track your location and to plan a route to your destination. Thus your brain is your most important navigational tool.
I was never happy with all of the books, videos and websites available to teach navigation so I created this guide to cover the basics of each of the principle tools of navigation – map, compass, and GPS unit.
You don’t have to read them in order but it will make more sense if you do.
Table of Contents
- Section 1 : Necessary Map Information
- Section 2 : Practical navigation with just a map
- Section 3 : Necessary compass information
- Section 4 : Practical navigation with a map and compass
- Section 5 : Adding a GPS unit into the mix
Section 1: Necessary Map Information
A good map is the most important tool for navigating (besides your brain). It uses colors, lines, symbols and labels to create a graphic representation of the Earth’s surface drawn to scale as seen from above. If you had to choose only one tool to navigate with, you would definitely want it to be a map. But without the skills to read and interpret the information on the map, even the best map would be worthless. Here are the essentials you need to understand in order to interpret a map:
Types of Maps
I am going to focus on topographic (topo) maps because they provide elevation information. A basic map (planimetric map) such as a street map portrays the horizontal positions of features; vertical information is specifically ignored. This is fine for finding your way from the sofa to the refrigerator because you can be sure there isn’t a 1000 foot deep ravine in your path. This may not be true when navigating in the wilderness.
 |
 |
Map Margins
Maps have all sorts of useful information in the margins; The authority responsible for the mapping, the quadrangle name, the state, the county, the key to roads on the map, the date of the map, the map scale ratio, the contour interval, the magnetic declination information, etc. Do yourself a favor and read all of the margin information on every map you plan to navigate with. Sometimes it is very important to know that the map is 50 years old. Just because the road was there 50 years ago, doesn’t mean that it is still there today. Knowing that the declination information (covered in the compass section) is out of date is very helpful too.
Map Colors
Five basic colors are used on Topographic maps.
- Brown (Contour Lines)
- Black (Man Made Features, Roads, Trails)
- Blue (Water Features)
- Green (Vegetation)
- Red (Highway and Land Grids)
- Two minor colors Pink (Built up area, civilization) and Purple (Updated Map Information)
Map Symbols
Map Symbols denote man-made or natural features on the earth. Every symbol drawn on a map is there for a reason. If you don’t understand what the symbol represents, you won’t be able to read and speak the map language to others. A detailed description of symbols and their meaning can be downloaded from the United States Geologic Survey (link to a PDF file).
Map Contour Lines
Contour lines display the vertical dimension of the map. This vertical dimension is also known as “relief”. By looking at the contour lines on a map, you can determine the steepness and elevation of the terrain.

The contour line joins points of equal elevation. If you followed the ‘180’ contour line in the picture at left, you would walk completely around the hill and return to your starting point without gaining or losing elevation.
Usually the elevation is not marked on each line as it is in the diagram to the left. That would make maps too busy. Instead every 5th line or so is marked and the interval between the lines is given in the map margin. The marked lines are usually drawn in a bold line.
Relief Features
Terrain features have been given names such as hill, valley, saddle, ridge, draw, spur, depression and cliff. 
If you look closely, you can see these features on a topo map. It is important to know what the feature looks like in the real world as well as on the map. The practical application of knowing these terms is that you can use them to communicate directions to others. “Stay on this trail and you will reach a saddle. After the saddle, the trail branches take the left branch.”
Map Scale
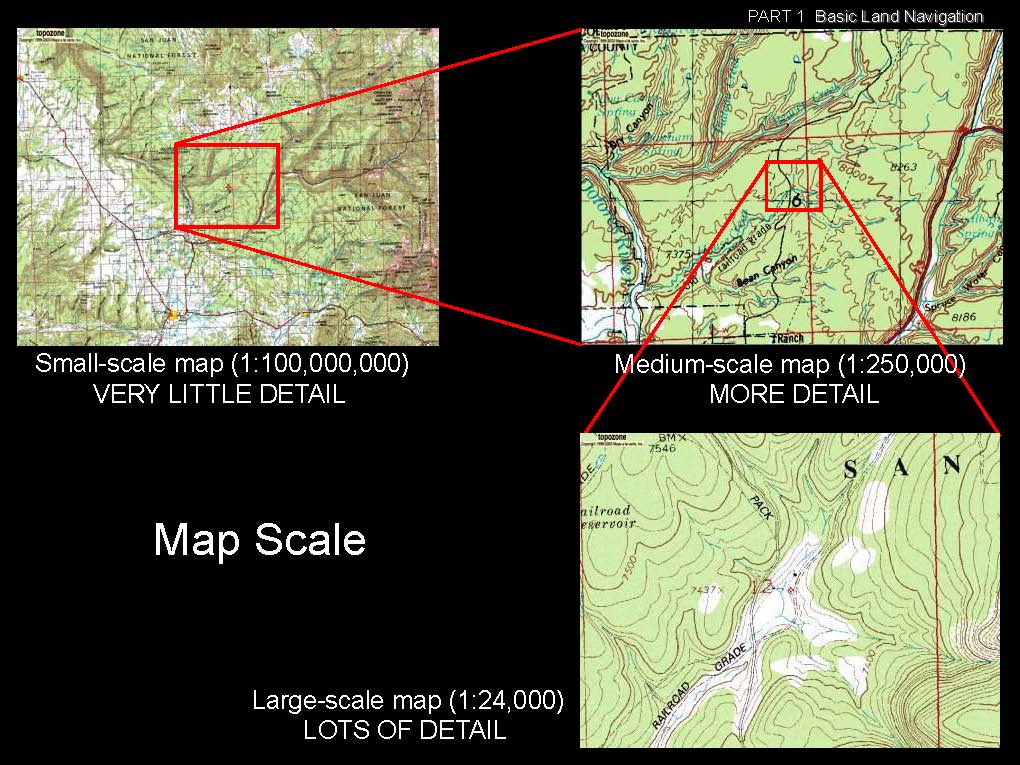 |
Map Scale is the relationship between distance on the map and the corresponding distance on the ground. This is expressed as a ratio and often displayed as a bar scale on the map. USGS 7.5 minute maps have a scale of 1:24,000 which means that 1 inch on the map corresponds to 24,000 inches (or 2000 feet) on the ground. This is an example of a large scale map. Large scale maps have more detail than small scale maps. Large = lots of details, Small = fewer details (an easy mnemonic to remember) For hiking, you will want a good large scale map.
Grid System
The simplest way to locate things on the map is to use a system of grid lines. It makes it easier if you need to call in an emergency helicopter or mark the location of pirate treasure. We will look at the two most common grids systems – Latitude/Longitude and the UTM grid.
Latitude and Longitude
Lat/Lon is by far the most popular grid system. It is a grid of lines running east-west and north-south. It was developed in the middle ages and it uses mathematical terms to express coordinate information. The equator (a line drawn around the middle of the earth) is broken up into 360 degrees. This allows you to express where you are on the equator by stating your degree. You can also express how far north or south of the equator you are in degrees because there are 90 degrees north and south of the equator. Look at the picture below and it should all make sense. It works okay for sailing or flying but as you will see it leaves much to be desired for land navigation.
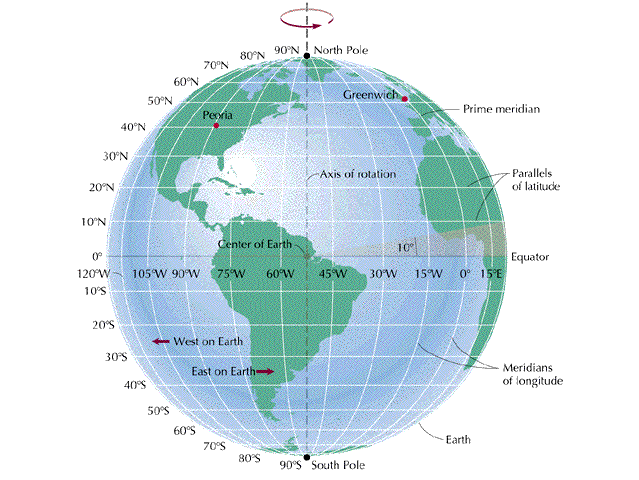 |
Latitude lines travel around the earth in the same direction as the equator (horizontally). They are parallel to each other and they never intersect. Because of this they are often referred to as parallels. If someone asks “What parallel are you on?”, they want to know your latitude. When you tell them, they will know how far north or south of the equator you are (in degrees) but you have to specify north (+) or south (-).
Longitude lines cross the equator at right angles. They converge at the North and South poles. They measure how far you are east or west of an arbitrary line called the prime meridian. They are also called meridians. If someone asks “What meridian are you on?”, they want to know your longitude. When you tell them they will know how far east or west of the prime meridian you are (in degrees) but you have to specify east (+)or west (-).
One problem with using Lat/Lon for navigation is that it is difficult to convert to a distance. If you need to travel 5° west, how far is that? To make matters worse, longitude lines aren’t always they same distance apart. They are farthest apart at the equator and they converge at the poles. At the equator, 5° west is equal to 346 miles (557 km) but in Maine (45 degrees latitude) 5° west is equal to 245 miles (394 km).
Another problem with lat/lon is that the measurement of one degree isn’t fine enough. One degree is equal to roughly 69 miles (111 km) at the equator. That is a very large distance in terms of hiking. Most of the time hikers are dealing with distances less than 10 miles (16 km). Ten miles would be equal to 0.144° and it gets difficult to work with such small numbers.
Another bit of confusion comes from the various ways in which you can write out fractions of a degree. If you have ever had to punch a coordinate into a GPS unit, you know that there are many ways of expressing fractions of a degree. This is because each degree is broken up into 60 minutes and each minute has 60 seconds. This is the same concept as the clock. Each hour has 60 minutes and each minute has 60 seconds. If someone said “Be back here in exactly 2.7547 hours!” it wouldn’t be as helpful as if someone said “Be back here in 2hr 45min 17sec!” Our clocks don’t display time in terms of decimal hours. They display in terms of hours, minutes and seconds. But GPS units are computers and they can understand lots of combinations of formats. To a computer, 2.7547 hrs (decimal hours) is just as good as 2hrs 45.28min (hours decimal minutes) or 2hrs 45min 17sec (hrs min sec).
Examples of the various types of lat/lon notations
| Name of notation | Example value |
| Degrees minutes seconds | 35°05’10″N 106°39’20” W |
| Degrees decimal minutes | 35° 5.2′ N 106°39.3′ W |
| Decimal degrees | 35.09°N 106.7°W |
Using lat/lon for land navigation has many problems and it has been supplanted by the better suited UTM grid. (covered next) It is still important to recognize the Lat/Lon marks on a map. Below is an example of a map with Lat/Lon and a UTM grid.
 |
If you are only going to remember one thing about Lat/Lon and maps, make it this: On most topo maps, the edges of the map will be aligned to ‘true north’. The left and right edges of most maps are parallel with a meridian. Each meridian line runs to the north or south pole. Thus if you followed the line the edge of the map makes, you would be traveling directly towards the North Pole.
Universal Transverse Mercator (UTM)
UTM is a grid system that has been adopted by virtually every military ground force in the world. It overcomes some of the flaws of using lat/lon because it uses a grid on a flat surface instead of putting a grid on a globe. The UTM grid doesn’t cover the entire planet as the extremes of both polar regions are not included. (If you need to navigate in those regions, you would want to use the Universal Polar Stereographic or UPS grid). The UTM system was cleverly designed to compensate for some of the unique problems encountered when converting coordinates from positions on the Earth to positions on a flat map. One problem is that the Earth isn’t a perfect sphere. It bulges in the middle. This means that grids applied to the equatorial region will have to be able to cover more ground than grids applied to regions near the poles. The UTM is also designed to avoid the use of negative numbers.
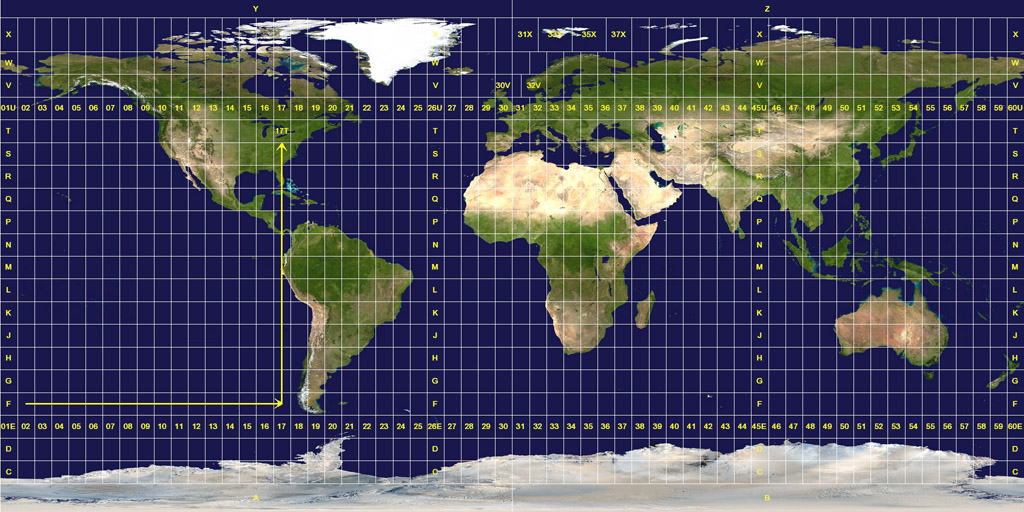 |
The UTM grid divides the world up into 60 zones. You specify your position by supplying your zone number and your Easting and Northing coordinate. Your easting coordinate is your distance in meters from west to east across your zone. Your northing coordinate is your distance in meters north or south of the equator. That’s it.
Specifying your UTM location
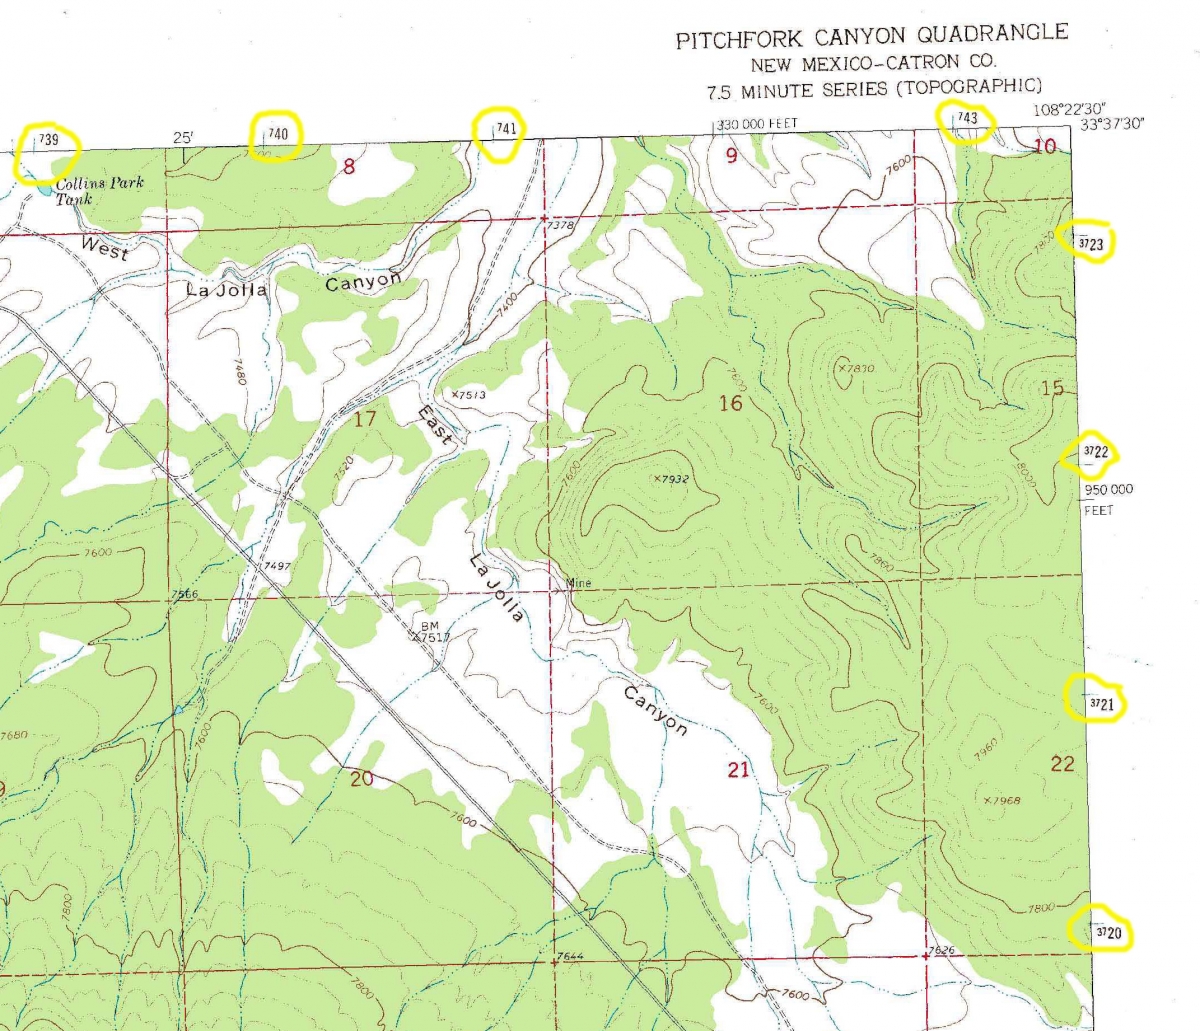
The UTM grid is based on the meter system, and grid lines are always one kilometer apart (1,000 meters). The digits indicating thousands of meters are usually emphasized in a larger font. Let’s use the Northing of ‘3957000‘ for example. Occasionally you will see entire number written out like this but most of the time it will be expressed as ‘3957‘. The 57 is in a larger font to indicate thousands of meters. If any of this is unclear, take a look at the picture above where the UTM coordinates are circled in blue. Looking at an actual map should clarify things greatly.
How precisely you specify your location depends upon how many digits you use. Let’s start with the least level of detail and work to the greatest level of detail.
| Coordinates specified as | Area specified | Comments | Example |
| Z13, Easting 373 Northing 3888 | (1000m x 1000m sq) | This is the grid shown on the topo map. |
|
| Z13, E 3734 N 38889 | (100m x 100m sq) | Possible with a map tool or really great eyeballing skills. |
|
| Z13, E 37347 N 388891 | (10m x 10 m sq) | Possible with a modern GPS unit. |
|
|
Z13, E 373475 N 3888915 |
(1m x 1m sq) | Theoretically possible on a GPS unit. (Don’t count on it) |
|
So the most practical way to call out your location would be the method that specifies a 100m x 100m area since it is about as specific as you can get by using just a map. But you don’t really need to say “My location is Zone 13, Easting 3734 Northing 38889″. Instead you could just say “My location is 73 thousand 400 meters East and 88 thousand 900 meters North”. You can omit the zone number because chances are you are communicating with someone else in your same zone. You can also omit the numbers before the Large font and just focus on the thousands digits (those are the numbers in large font) and the 100’s digit that follows them.
 |
Using a map tool:
Use of a map tool really simplifies pinpointing your position down to a 100m square. There are many different map tools that you can use. Make sure that the tool that you use is designed for the scale map that you are using. In this case, the map tool is designed to work with the USGS 7.5 minute topo maps. It breaks up the 1000 meter grid already printed on the map into 100m grids. That is about as much resolution as you can practically use any way.
MapTools.com has a wide assortment of map tools for sale. I’ve built my own map tool for use with 1:24,000 (7.5 minute) maps and you can download it for free. I print it onto a sheet of transparency paper.
Township Grids:
One last grid that you might see on topo maps is the Township Grid. In 1785, the United States Public Land survey was started and land was to be divided into townships six miles square. Each township was subdivided into 36 numbered sections of 1 square mile each.
 |
The surveys were not completed and thus it is not applicable to many parts of the United States. This grid should not be used for navigation but if you see the lines for it on a topo map you will know what they are for. Don’t be fooled into thinking that they are UTM grid lines.
That should cover all of the basics for what you need to know about a map.
Section 2: Practical navigation with just a map
Navigation is about keeping track of your location as you move away from a known position. It consists of executing three distinct actions.
- Determining where you are now. (In the real world as well as on the map)
- Planning a path to the next destination. (Making note of relevant information about that destination)
- Moving to the destination and recognizing it when you arrive.
Step 1: Where am I now?
At the start of your trip this should be easy to answer. You should easily be able to identify where you are on the map (start of a trail head, parking lot, etc). You will need to answer this question over and over again as you navigate. This requires paying attention to terrain features and to features on the map as you navigate.
 |
If you only have a map, your best option is to use ‘resection’. Resection is finding features in the landscape that also appear on the map and making note of what position you would have to be in to see the features at that particular angle. This is easier to explain with a graphic.
Resection becomes a much more powerful tool when you have the aid of a compass. That technique will be explained in the Practical Navigation with a map and compass section.
Step 2: Planning a route to the next destination
If your final destination is very far, you will probably want to create intermediate destinations so you can track your progress and location more frequently. These checkpoints should be easy to find on the map and in the real world.
 |
The example image shows ‘legs’ that start and end at locations that should be easy to find in the real world. Intersections of roads, streams, trails, or locations next to a very prominent landmark make for good checkpoints. Once you have decided on a checkpoint, it is a good idea to note the distance to the checkpoint and, if you have a compass, the bearing to the checkpoint. Noting the departure time from the last checkpoint can be very helpful too.
As a navigator you will often be called to decide upon a route that is shorter but more risky (steeper terrain, less clear check points, etc.) or a route that is longer but safer. It almost always pays to take the longer route. Never underestimate the amount of time it takes to recover from missing an important turn or the amount of effort it takes to climb and descend the short direct route.
One useful trick in route planning is to ‘aim off’. Aiming off is when you don’t try to go directly to your destination but instead aim for a feature that you can follow to your destination.
 |
A good example of this would be a bridge over a river. If you try to travel directly to the bridge, you might miss it on either side, but if you purposely aim for the river on one side of it, you can then follow the river until you reach the bridge. This is more clearly illustrated at right. The feature could be a road, or a ridge line. It could also be a contour line. You might aim for a feature that is at the same elevation as your destination and then follow the contour line around (being careful not to gain or lose elevation) until you reach your destination.
Step 3. Moving to the destination and recognizing when you have arrived there.
Without the aid of a compass, you will be forced to rely on the remaining tools that you have.
- Paying acute attention to landmarks that you can also find on the map.
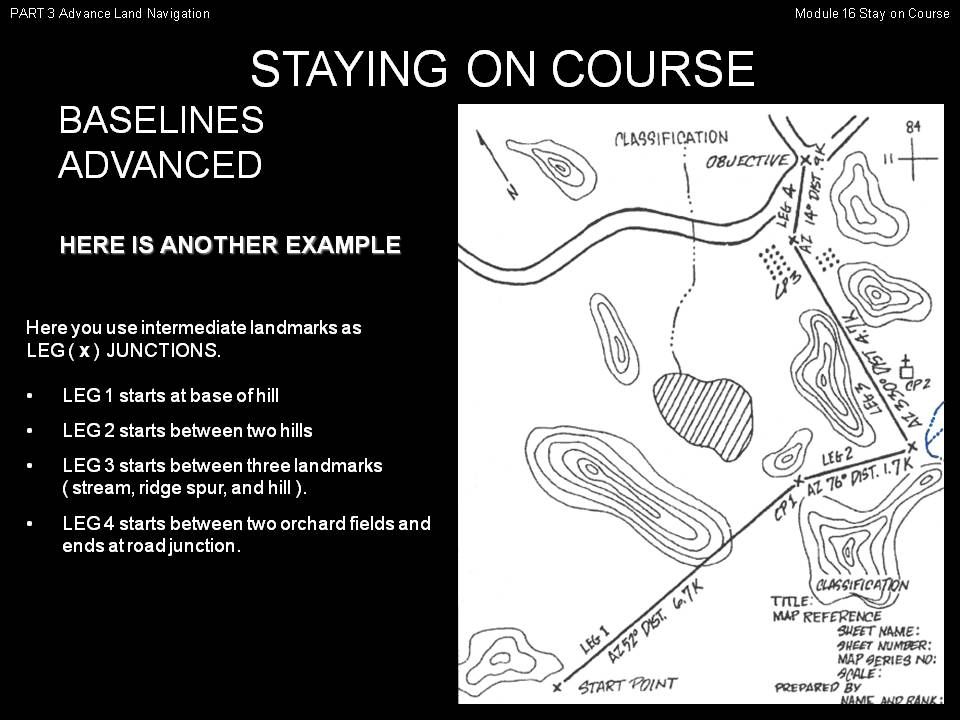
- Creating a baseline to keep your bearing. (Very helpful when moving around obstacles)
- Estimating distance traveled by time or pace count
Paying attention to landmarks that you can find on the map, allows you to constantly check “Where am I now?” Using the landmarks and the map, you can do a quick resection and keep track of your location. This may not be possible if you are traveling in thick jungle or forest where appropriate landmarks are not visible.
Creating a baseline is when you line up two distant objects (that will always be in sight) in the direction you want to travel.
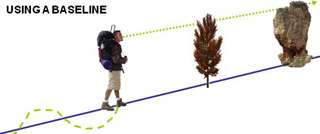 |
If you have to detour to travel around and obstacle, you get back to course by moving until the two points are again aligned. Once back on your baseline, you can resume travel.
This technique can also work in thick vegetation like a jungle or forest. But the objects that you line up will be much closer to you. Once you reach the objects, you will need to find two more objects on your baseline and then move towards them. Repeat until you reach your destination.
Estimating the distance you have traveled can help you to estimate your location on the map in the absence of obvious landmarks. An easy way to do this is to wear a pedometer. They are extremely inexpensive (often less than 5 dollars) and they do a decent job of estimating your distance. They are so easy to use that it is difficult to recommend learning pace counting techniques and Ranger beads that were used before pedometers became popular.
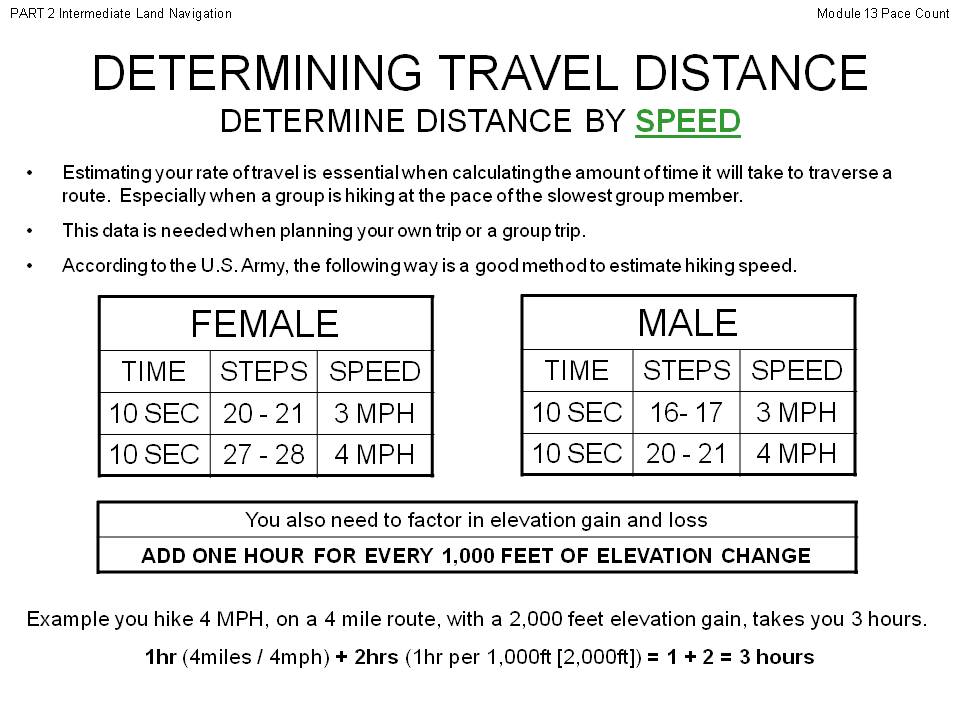 |
Your other option for estimating distance traveled is to use the US Army’s guide (shown right) or to simply hike often enough that you get good at estimating how fast you are hiking. Assuming you are wearing a watch, you can then estimate how far you have traveled. Go buy a pedometer! Easy, inexpensive, fairly accurate, what’s not to like?
If you are lucky, you will be able to select a good checkpoint that has prominent landmarks and it will be obvious when you reach the checkpoint. If you are unlucky, you will have to use all of you mental skills and the tools at hand to determine if you have reached your checkpoint. The most powerful tool you have is your brain and the only way to sharpen that tool is to practice, practice, practice.
Section 3: Necessary compass information
A compass is a simple tool if you know how to use it
A compass is just a tool that helps you orient yourself. It does so by showing you which direction is north (mostly). From that bit of information, you can work out your orientation. This is most useful if you have a map. It sounds easy in theory but in practice you need to know where the compass needle really points. It is also extremely helpful to understand some terms like declination, mils, and deviation. I’ll cover all these things in this section. If you don’t have a compass, here are some techniques you can use to orient yourself.
What features to look for in a compass
There are many types of compasses. Some are designed for orienteering, some are designed for professional surveying, others are just a simple magnetic needle. No matter which compass you get, you want a compass that is accurate, durable, and easy to use in low light. It is easier to use a compass that has a dampening mechanism, as well as, a bezel that is marked in degrees from 0° – 360°. I prefer a compass with a sighting mechanism and a rotating bezel. Because there are so many good compasses out there, I’ll just skip to talking about my favorite compass.
If you are going to own only one compass, make it the Cammenega 3H. It comes in green and black and in a non tritium version. It’s the official compass of the US military. Don’t be fooled by the many imitation compasses on the market. Get the real thing. You won’t regret having a quality tool.
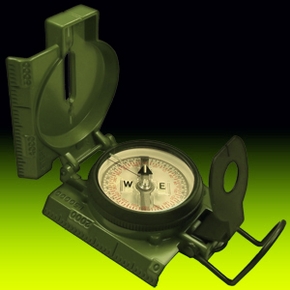 |
- Precise, durable, accurate.
- Shock, water and sand proof. Functional from -50F to 150F.
- Copper induction dampening system slows the rotation of the needle without the use of liquids.
- Deep-well design allows the use of the compass globally with little or no effect in accuracy caused by a tilting compass dial
- Luminous lights allow for navigation in low light conditions.
The three most outstanding features of the Cammenega 3H are:
1.) The ability to quickly take hyper accurate readings.
2.) The copper induction system that dampens the needle without the use of liquids.
The dampening system consists of a copper cup surrounded very closely by rare earth magnets. The movement of the powerful magnets induces eddy currents in the copper. These currents produce a magnetic field of their own which interfere with the magnetic field of the permanent magnets. This has a braking effect on the motion of the magnets. The faster the motion of the needle, the greater the braking effect. There are many very cool videos on YouTube that illustrate the breaking effect of eddy currents.
3.) The deep well design that allows the compass to be used globally.
The Earth’s magnetic field has both a horizontal and vertical component. This causes the compass needle to point down vertically into the Earth at the magnetic poles and to stay horizontal at the equator. A compass with a needle that is balanced to work in Northern Europe will not be balanced correctly for use in Australia. The 3H is designed to function anywhere on Earth.
Where does a compass point and what is declination?
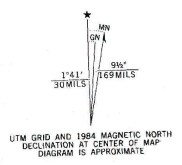 |
Most topographic maps will have a declination diagram like the one shown at right. This diagram shows the difference in degrees (and mils) between true north, grid north and magnetic north for this map; True north is denoted by the star, grid north is denoted by GN and magnetic north is denoted by MN. It may seem complicated but unless you need to accurately coordinate with a group (search and rescue, military operations, etc.), you will most likely only care about true north and magnetic north.
Here is the difference between the 3 norths:
1.) True north is where the North Pole is located. When you travel true north, you are following a longitude line to the North Pole.
2.) Magnetic north is where a compass needle points.
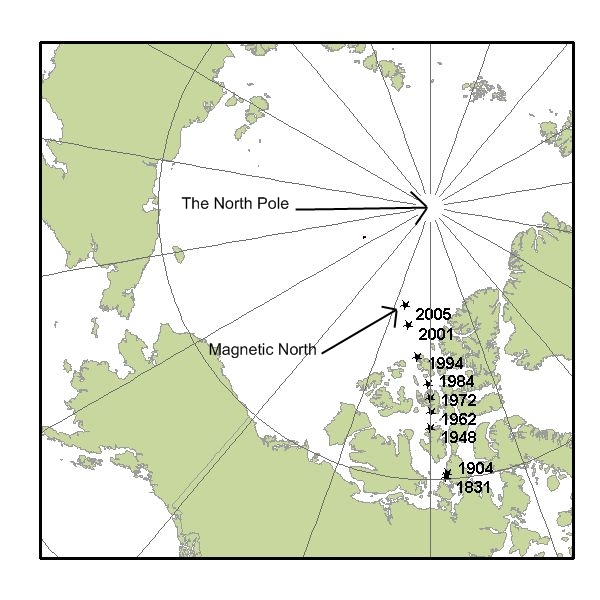 |
The Earth’s iron core acts like a giant magnet and one of the ‘ends’ of the magnet is near the North Pole but not at the North Pole. As you can see from the illustration at right, the magnetic north pole drifts from year to year. The difference between the location of the North Pole and the location of this magnetic pole is called magnetic declination (or just declination).
The declination is usually printed on the map when the map is created but depending upon how old the map is it may be out of date. You can find the current declination information for an area from sites like the National Geophysical Data Center or Magnetic Declination.com
The difference between true north and magnetic north has some implications for using a compass to navigate. If you were in the state of Maine and you followed the compass needle north, you would be following a path that is 18 degrees to the west of true north.
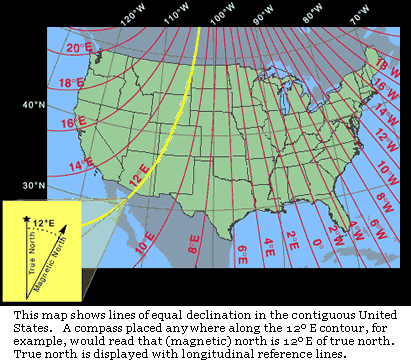 |
If you were in the state of Colorado and you followed the compass needle north, you would be following a path that is 12 degrees to the east of true north. This is illustrated with a declination map at left.
This means that if you want to travel true north, you will need to adjust the reading you get from your compass to account for your current declination.
You can find a much more detailed declination map from the US National Mapping and Imagery Agency and an animated map showing how the magnetic pole has moved from 1590 to 1990.
3.) Grid North is north according to the UTM grid . The reason that grid north and true north are different comes from drawing the UTM grid (which is a flat) onto the spherical surface of the Earth. Here is how it works: The UTM grid is divided into zones. An artificial meridian is drawn down the center of each zone and it is given a value of 500,000 meters. Grids are then drawn based upon this meridian. Grids that are west of this meridian decrease in number and grids that are east of this meridian increase in number. The farther you are from this central zone meridian the greater the difference between grid north and true north . This is illustrated in the slideshow below. Click the left most image.
 |
 |
 |
 |
What are Mils?
A mil is a unit of angular measure. The word ‘mil’ comes from milliradian.
There are 2000π (≈ 6283.185 ) milliradians in a circle.
 |
The 6283 has been rounded to 6400 because 6400 is much easier to divide into parts and to work with. If your compass displays mils as well as degrees, you will see that 6400 mils = 360 degrees. Declination is often given in degrees and in mils and the advantage of mils is there are no messy fractions of a degree to deal with. See how the declination diagram above shows that grid north is 1°41′ or 30 mils? The 30 mils is easier to add or subtract. If you were working with a compass that only shows degrees, then you would have to round the 1°41′ up to 2°. This would probably be fine for most navigation but if you want to be hyper-accurate (Maybe you want those artillery shells you are calling in to land on target and not on you) then mils is the way to go.
Compass Deviation
A compass is a sensitive instrument and electrical sources or metal objects with magnetic properties such as iron or steel can influence your compass. This influence is commonly called deviation. The chart below shows the minimum distance you need to be from any of these objects to avoid problems. I have personally experienced this problem when a lanyard clip that looked brass turned out to be steel. I carelessly clipped a compass onto the lanyard and it resulted in a deviation of about 10 degrees. When I went to pin point my position with accuracy I couldn’t. One degree of compass error equals about 100ft of ground error per mile traveled. That means that 10 degrees is about 1000ft of error per mile traveled.
| Power Lines | 60 yards/meters |
| Vehicles | 25 yards/meters |
| Wire Fences | 10 yards/meters |
| Rifle | 1 yard/meter |
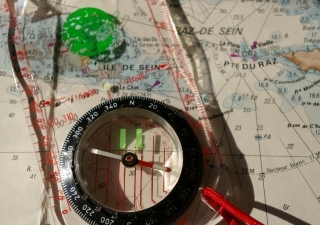
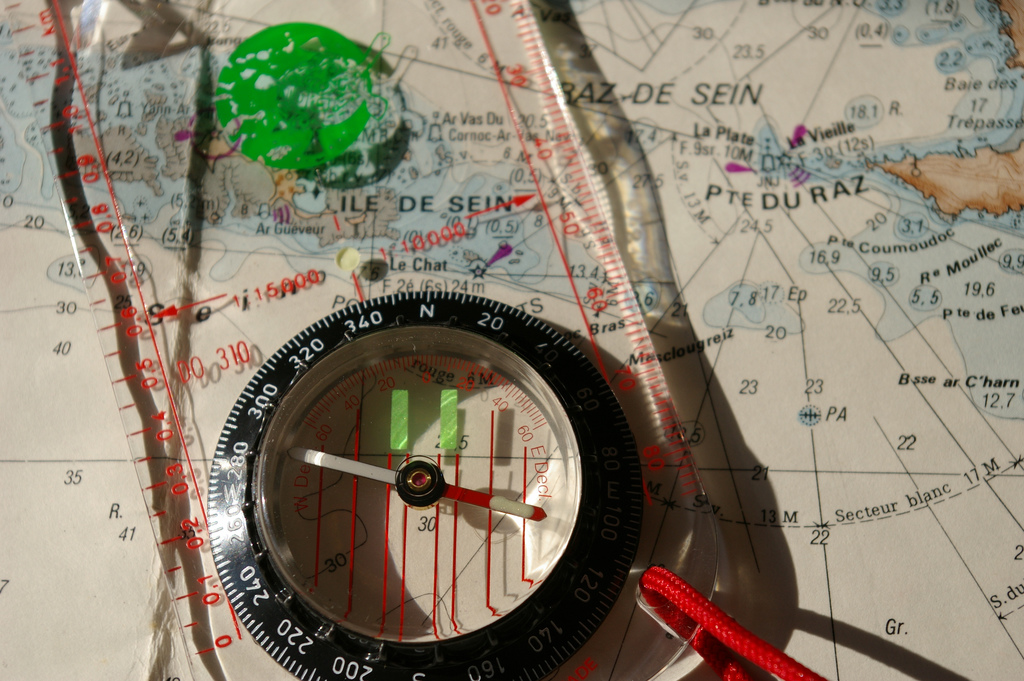
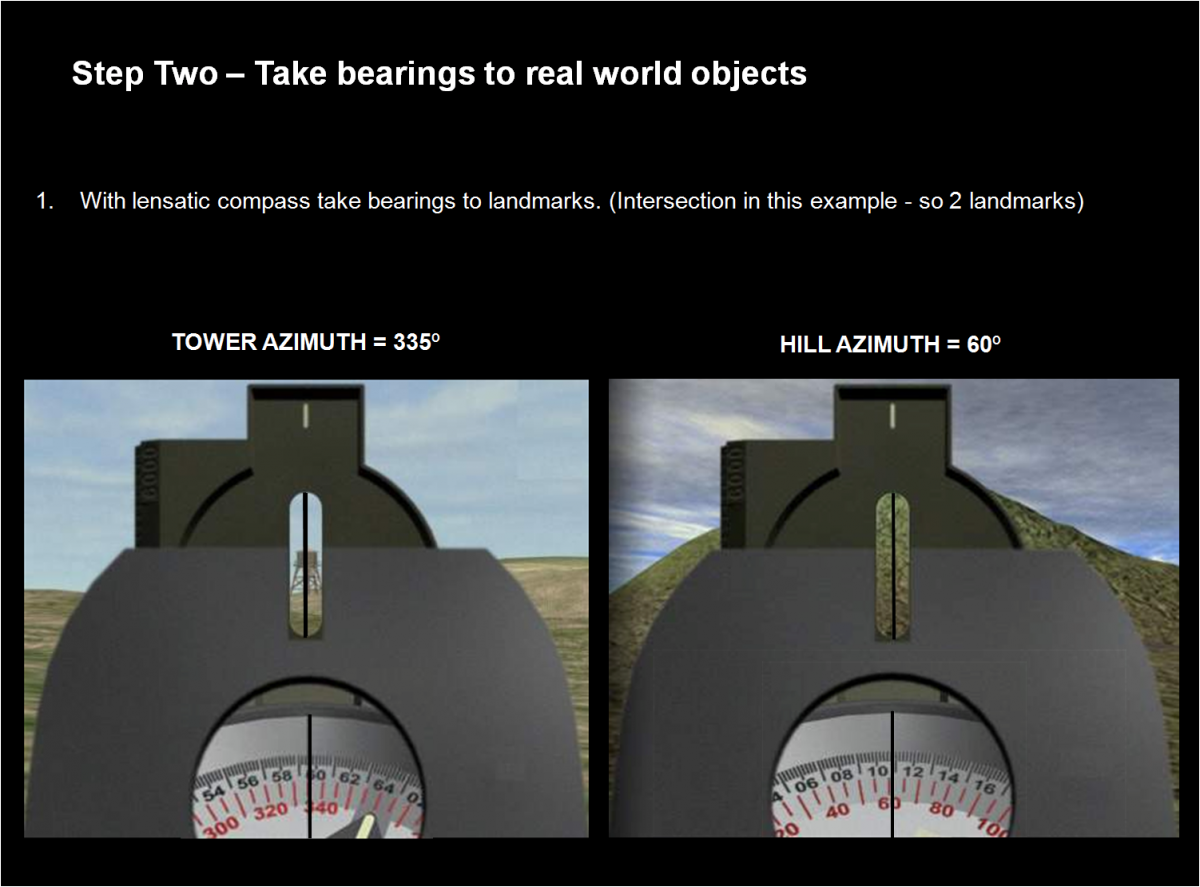
Use a compass to take an azimuth (or bearing)
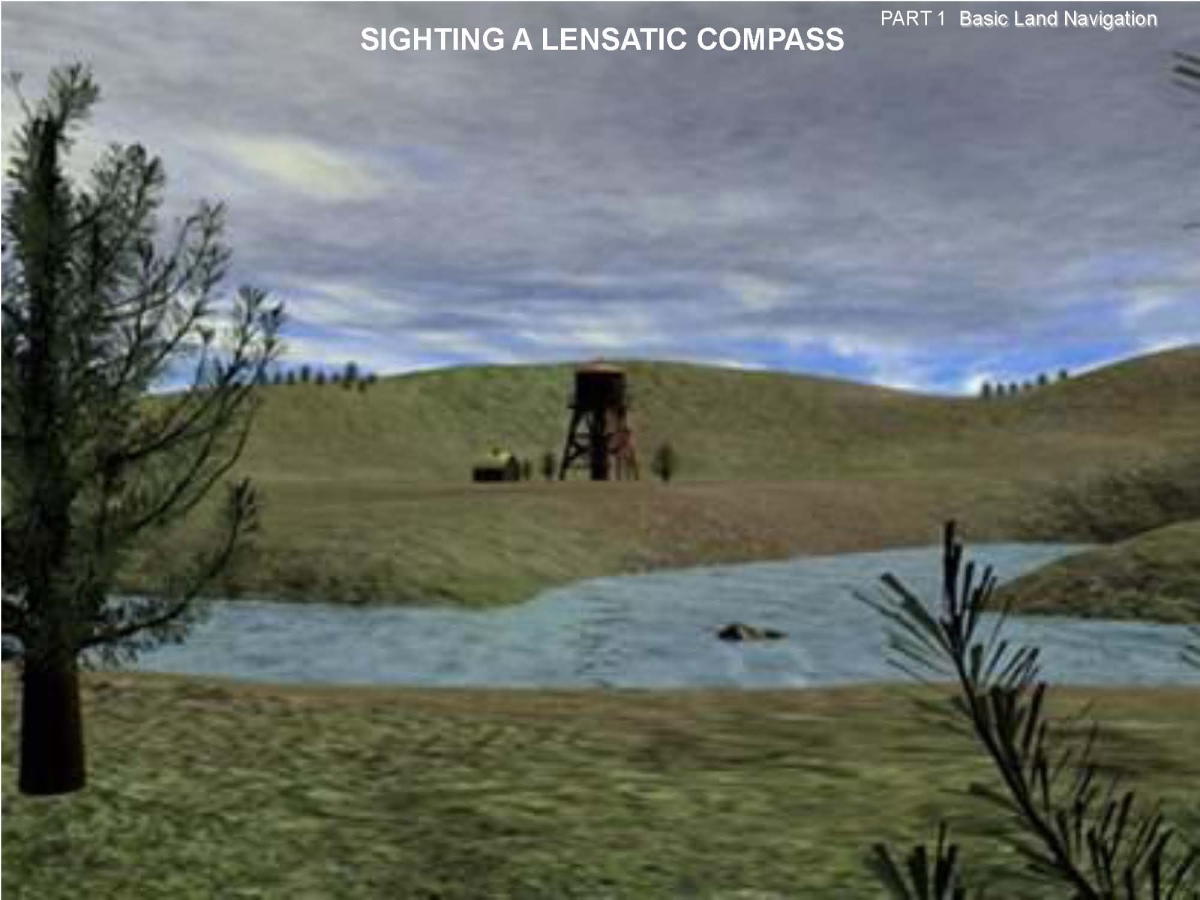
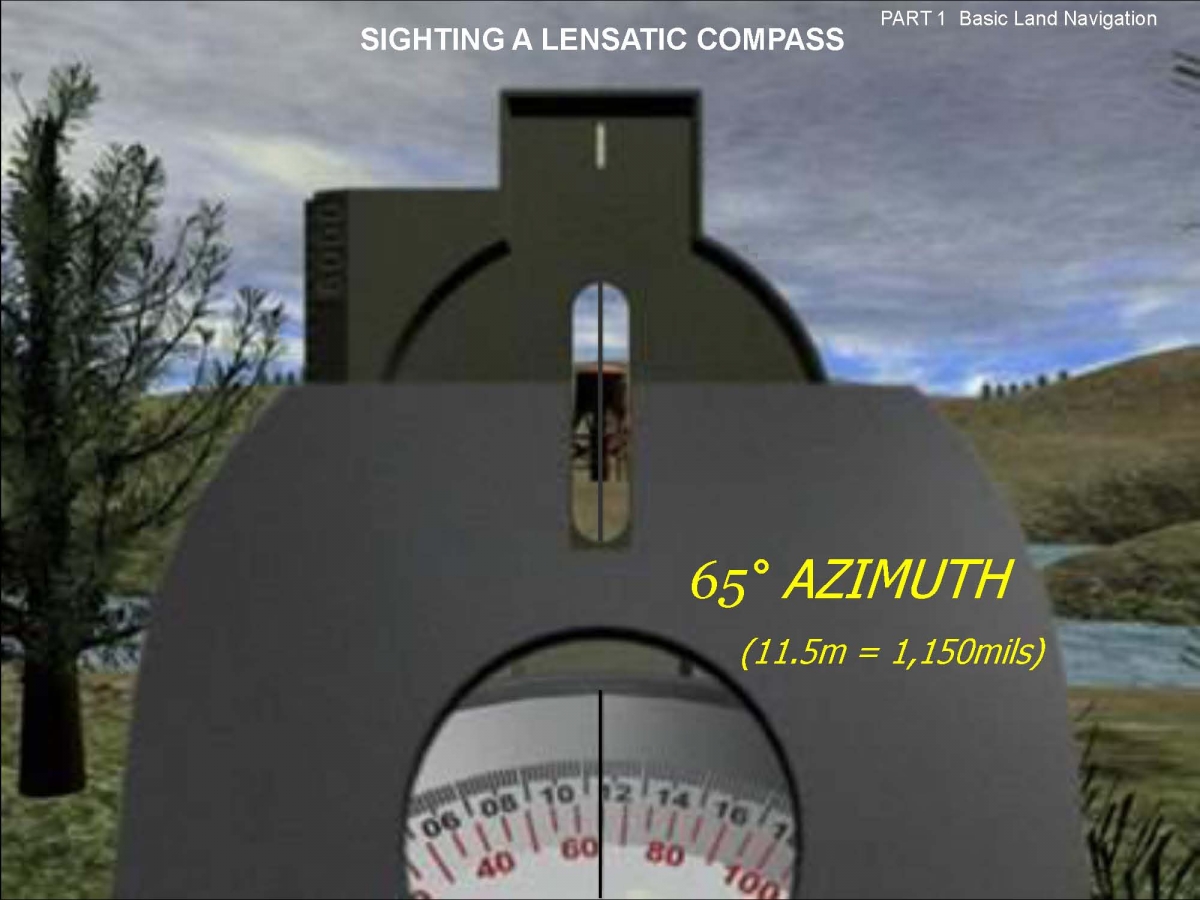
Many compasses have some sort of sighting system. Some use mirrors, some use a lens but what it all comes down to is figuring out what angle an object you want to sight is from magnetic north. (This is called an Azimuth or sometimes a bearing) It sounds more complicated than it is. I’m only going to cover using a lensatic compass but if your compass has any kind of sighting system you can read how to do the same thing in its instruction manual.
 |
 |
 |
Section 4: Practical navigation with a map and compass
Navigation is about keeping track of your location as you move away from a known position. Having a compass just gives you another tool to do that. You are still going to execute three steps.
- Determining where you are now.
- Plan a path to the next destination.
- Move to the destination and recognize it when you arrive.
1.) Where am I now?
Using a compass and a map together, is very powerful for locating your current position. The techniques shown below are the very heart of land navigation with a map and compass. Unfortunately, they are also the most complex to explain (and to use) because north on the map is different than north according to the compass. This means that you have to convert readings when going from one to another. I’ll explain this step by step as the article continues.
Four techniques to find your position – These techniques show how to use a bearing from your compass to find your location on a map. Let’s simplify things and assume that true north, magnetic north and grid north are all the same. This means that we can take readings from our compass and transfer them directly to the map without having to do any type of conversion. This will allow us to focus on the technique. Converting bearings will come later.
 |
1. Modified Resection – is used to find your location when you are on a linear feature like a trail, road, river, ridge line, etc. You know that you must be somewhere on that linear feature but where? If you can take a bearing to a feature that you can also find on your map, you can locate your position. Your position will be at the intersection of the bearing and the linear feature.
This method works well as long as the linear feature is still in the same place as when the map was created. Some features like roads, rivers or trails may have moved since the map was made.
 |
2. Distance Resection – is used to find your location when you can take a bearing to a feature (that you can find on the map) and you also have some way of measuring how far away that feature is. Given these two pieces of information, you can locate your position on the map. In a future article, I will cover techniques on how to estimate or measure distance to an object.
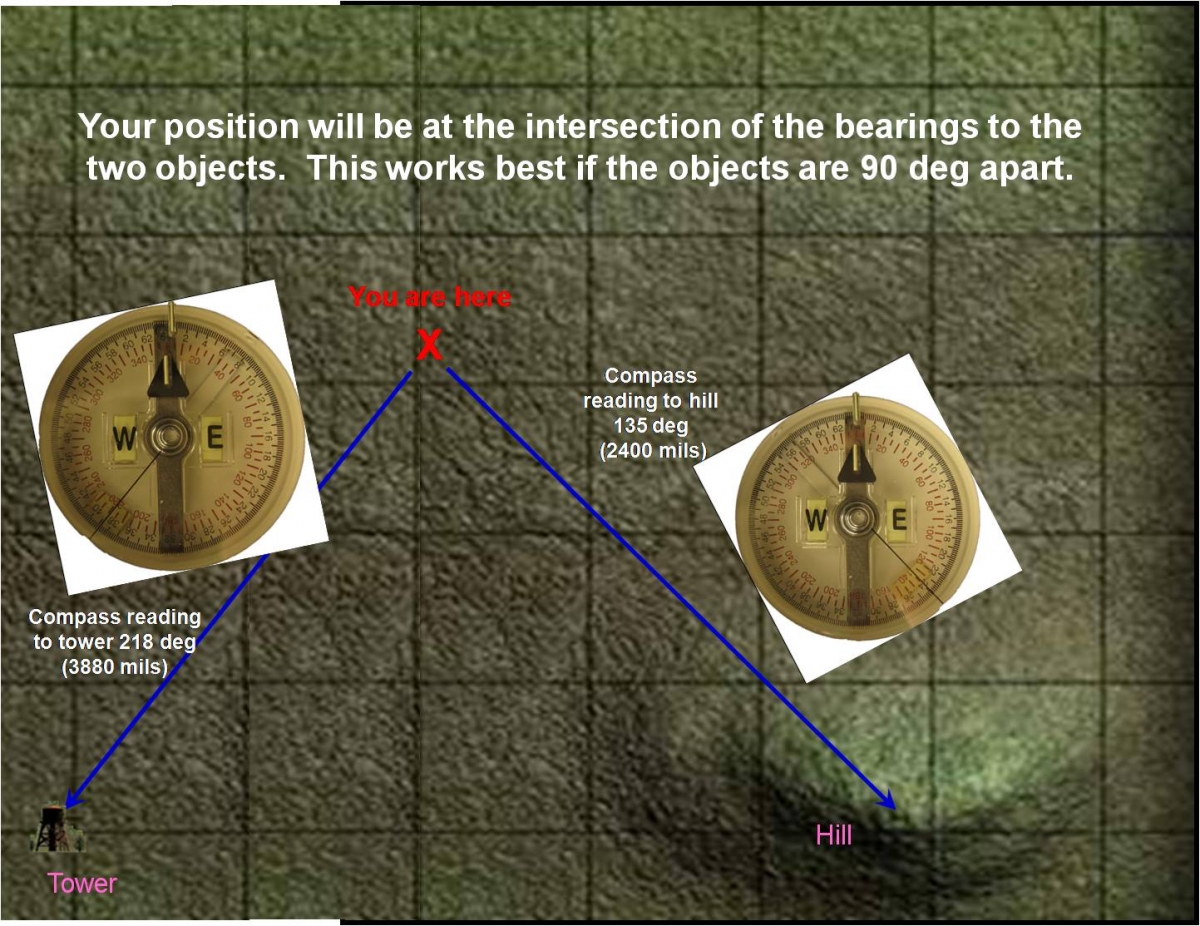 |
3. Intersection-Is used to find your location when you can take bearings to two features that you can find on the map. It works best if the two features are 90 degrees apart. The intersection of the bearings is your location.
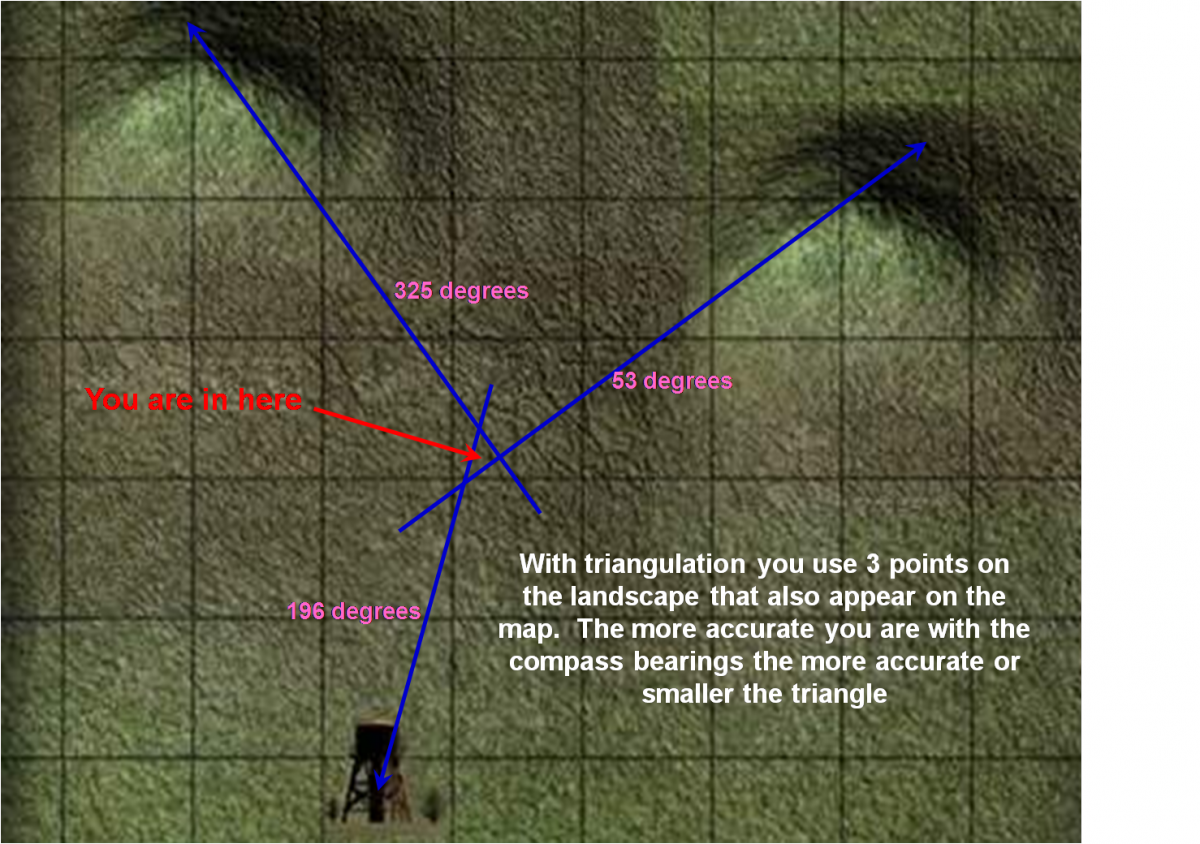 |
4. Triangulation – Is used to find your location when you can take the bearing to three features that you can find on the map. Your location will be inside the triangle. The more accurate your bearings, the smaller and more accurate the triangle will be.
In the examples above, I have assumed that the three norths are all the same thing. This makes it very easy to transfer bearings from the compass to the map and vice versa but there are very few places on Earth where all three norths are the same. You measure bearings on the map in terms of true north but when you measure the bearing to a landscape feature you are measuring in terms of magnetic north. This conversion is what causes the most confusion when navigating with a map and compass.
Two techniques to convert compass bearings to map bearings
If you are trying to figure out “Where am I?”, you will be taking compass readings and transferring them to the map. This means you will want to convert compass readings (based off of magnetic north) and transferring them to the map (based off of true north). If for some reason your map is based off of grid north, the process is the same just substitute grid north for true north.
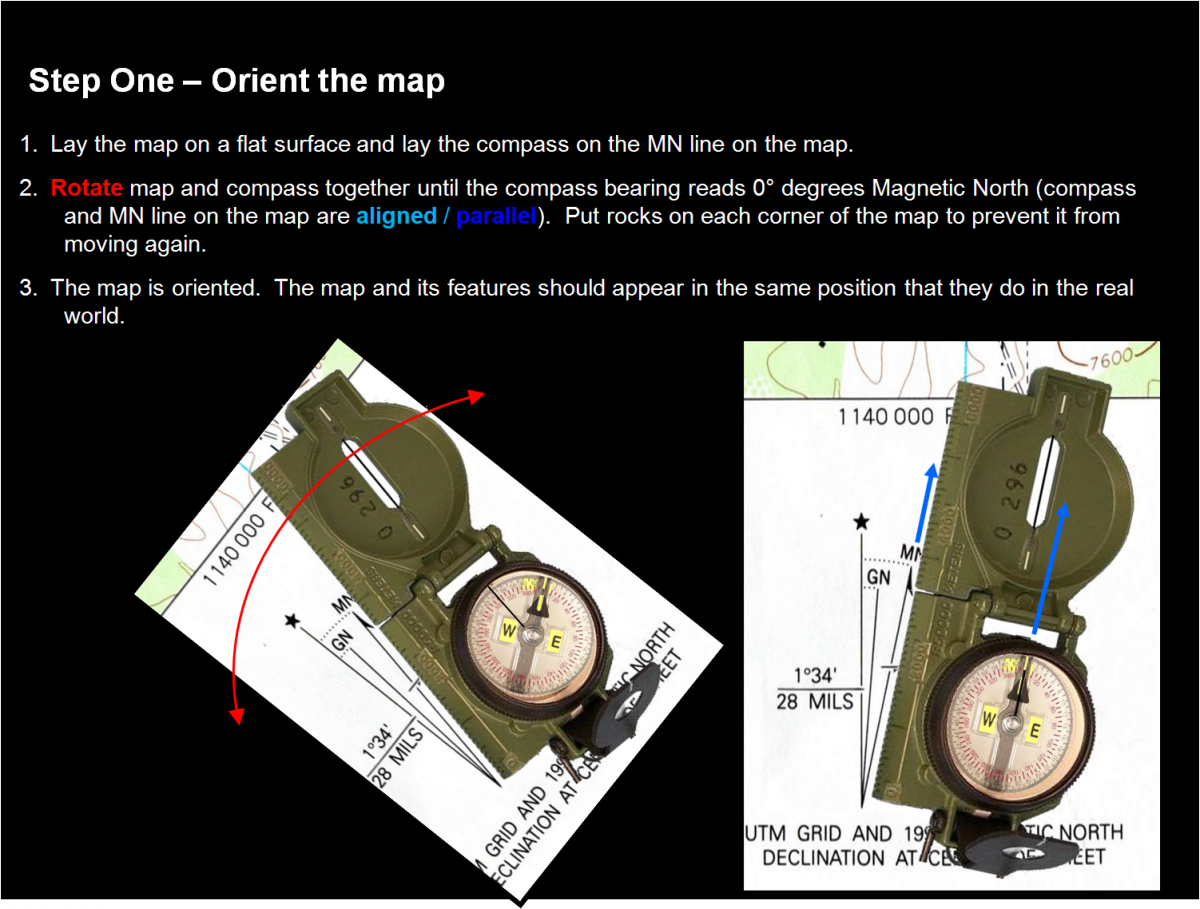
1.) The easy way – Orient the map and then use the compass to work in terms of magnetic north
This technique is simple. You position the map so that the edges of the map are pointing to true north, then you take a reading to an object with your compass and you lay the compass on the map with the same orientation. You have now transferred the bearing to the map. This is much easier to see in the illustrations below. Just follow these three steps.
- Orient the map to true north.
- Take a bearing to real world object
- Lay then compass on the map with the same orientation to transfer the bearing to the map.
 |
 |
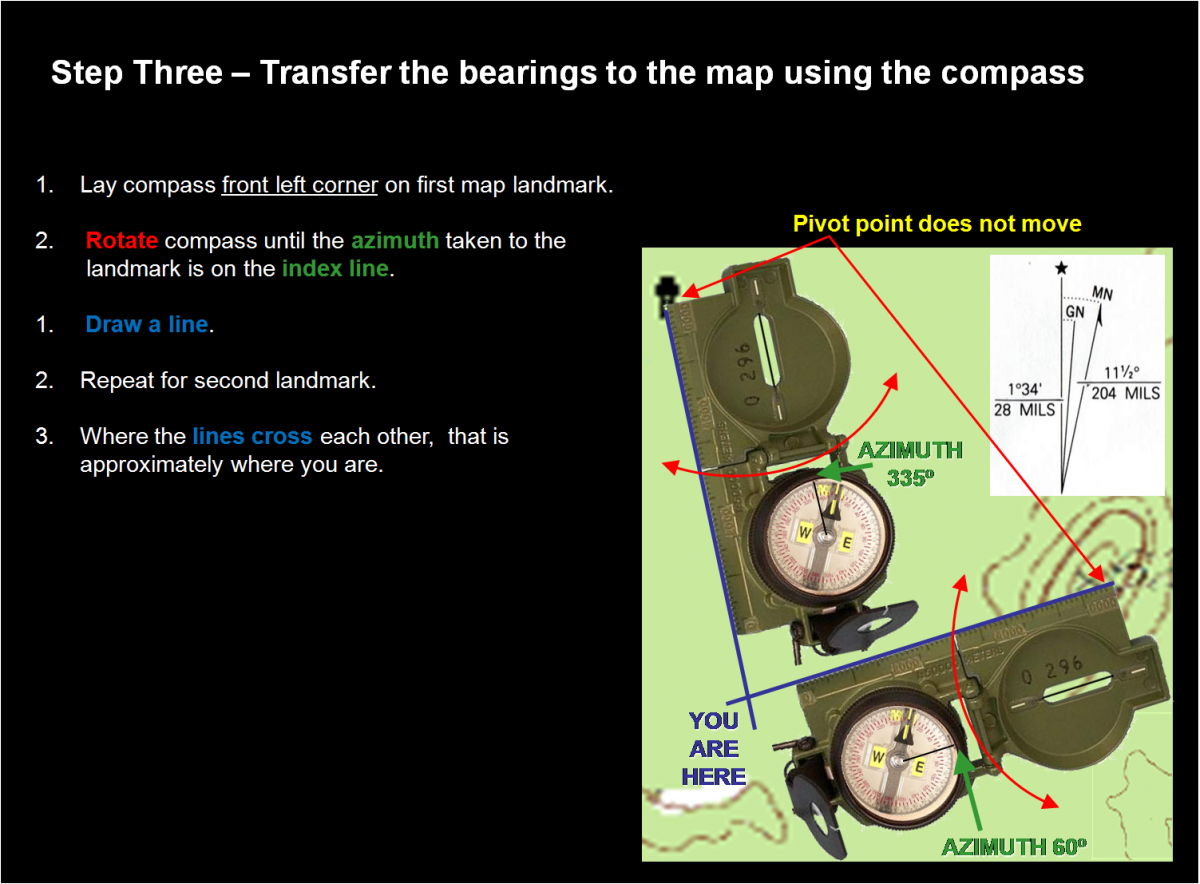 |
2. Another way – Add or Subtract the declination to convert a compass bearing to a map bearing
With this technique, you don’t have to orient the map but you will need a map tool or protractor. In my examples, I am going to convert from magnetic north to true north but you could convert to grid north using the same technique – just substitute grid north for true north. Here are the steps.
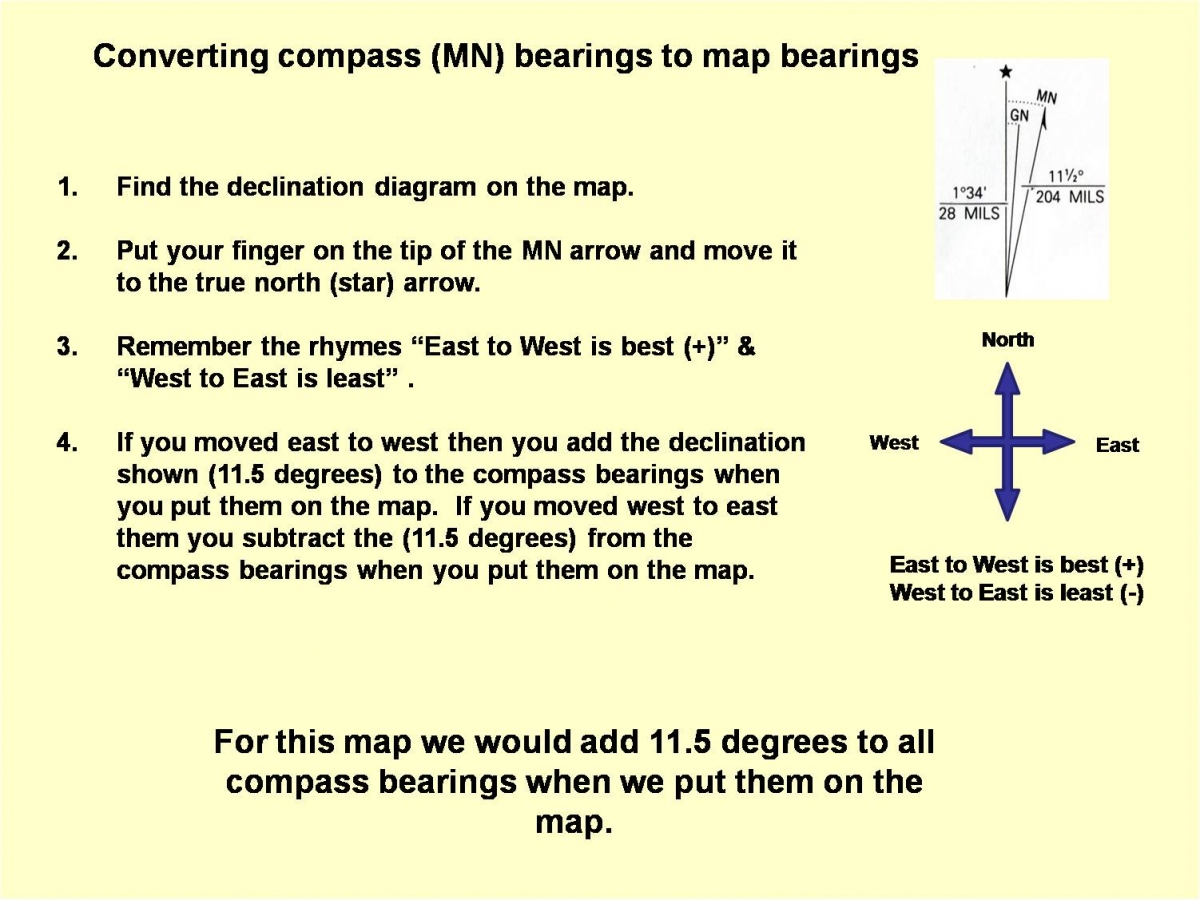 |
- Find the declination diagram on the map.
- If you put your finger on the MN line and you move it to the TN line, is your finger moving east to west or west to east?
- Use this rhyme to remember if you need to add or subtract. “West to East is Least (-). East to West is Best (+)”
- Add or subtract the declination amount shown in the diagram to your compass bearings when you put them on the map.
 |
It makes so much more sense when you can see an example. Click on the example at left.
Here is a link to the map tool that I made for 1:24,000 scale maps. I print it on transparency film and then cut it out. I poke a pin hole in the very center and I poke the end of a piece of thread through the hole and tie knots in the thread to keep it in place. The other end can then be used to find bearings. (The string acts like the blue line in the example at left)
 |
How to set and follow a bearing
I’ve discussed how to take bearings off your compass and put them on the map but you will also need to know how to go the other way. You will want to transfer bearings from your map to the compass and then you will want to follow that bearing. The graphic at right explains how to do it.
2.) Plan a route to your next destination
A compass allows you to plan a route based on bearings. Here are two good examples of how a compass can help you plan a route to your destination.
1.) Follow a bearing away from a known position
Let’s say that you are hiking on a trail in a heavily wooded forest. You come to the intersection in the trail and, after consulting your map, you decide you want to visit a well that is to the south east. There are no trails to the well. How will you find it? The short answer is that you find the magnetic bearing to the well and then you set your compass to that bearing and then you follow that bearing until you have reached the well. This is an example of following a bearing away from a known position. You can find the magnetic bearing to the well by either of the options illustrated below.
 |
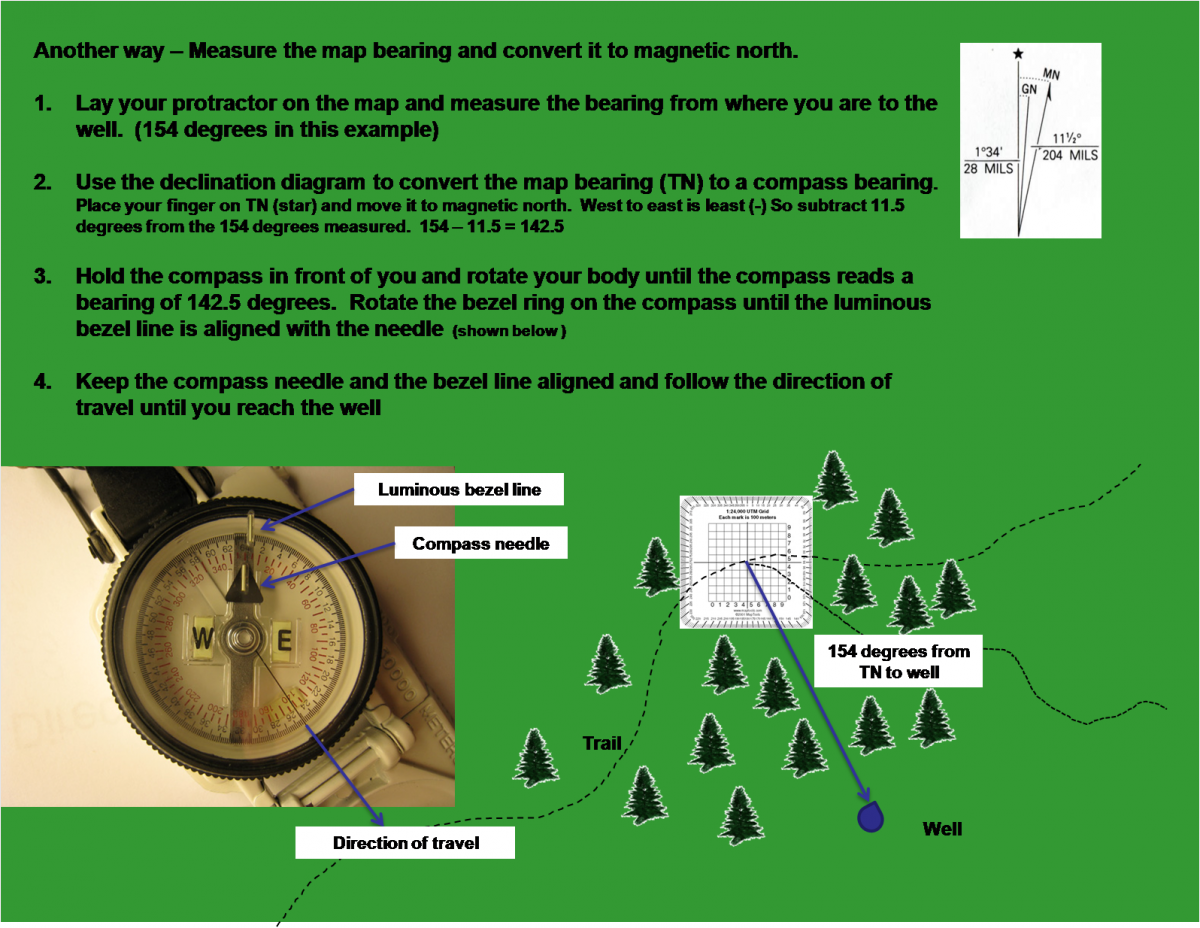 |
2.) Navigate using bearings when you are in country with no trails.
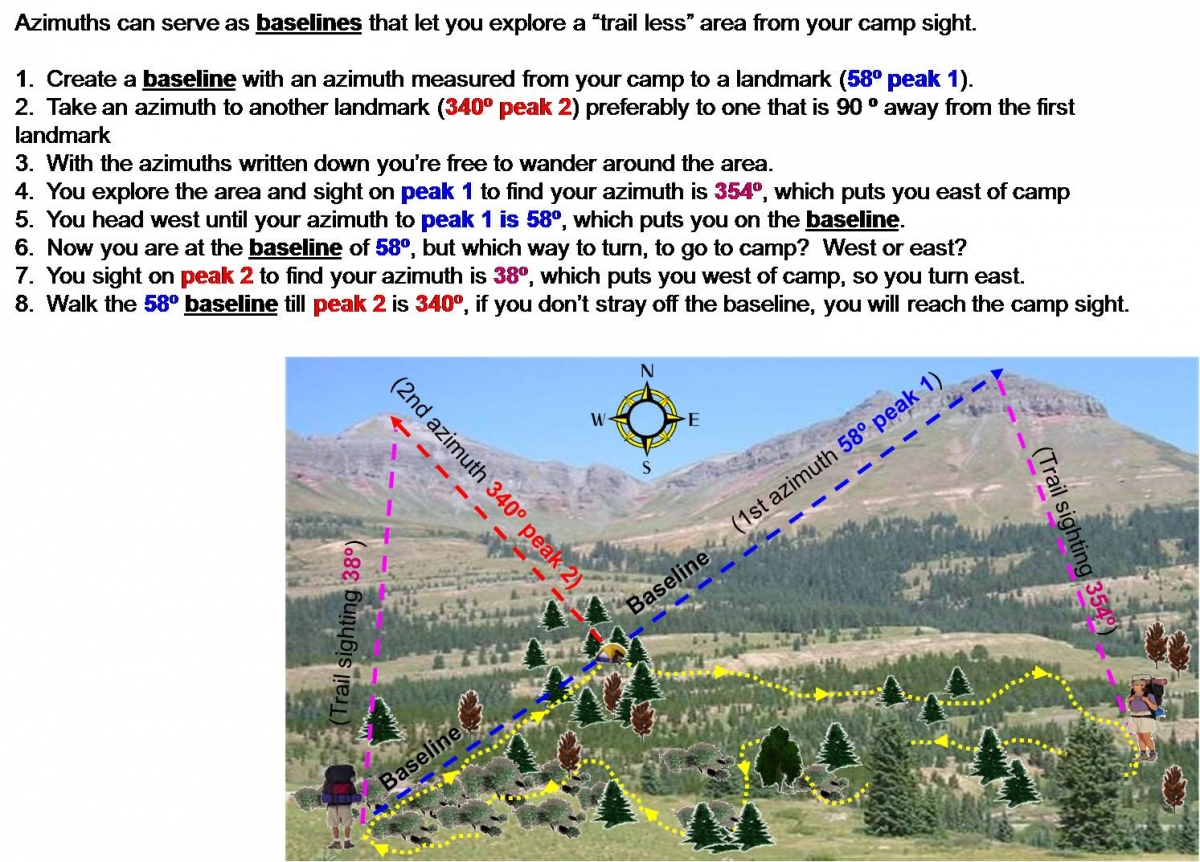 |
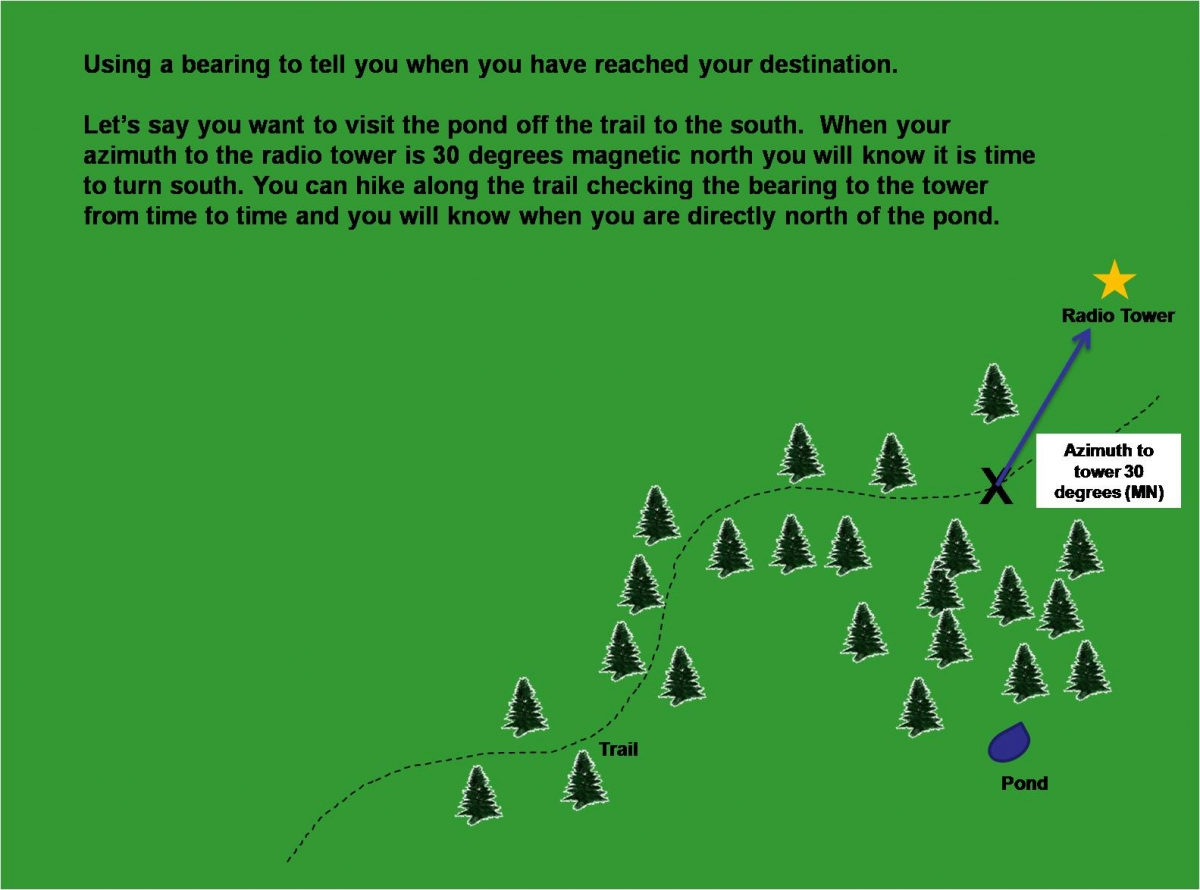
If you are fortunate enough to be traveling in country that has landmarks visible from almost everywhere, your compass becomes a very valuable tool. You could use the compass alone to navigate, as shown in the example at right. It demonstrates finding your way back to camp using just the compass. When combined with a map, the same techniques could be used to find any location that you could find on the map. You could have used the map to determine that your destination had an azimuth of 58° to peak 1 and 340° to peak 2.
3.) Move to a destination and recognize it when you arrive
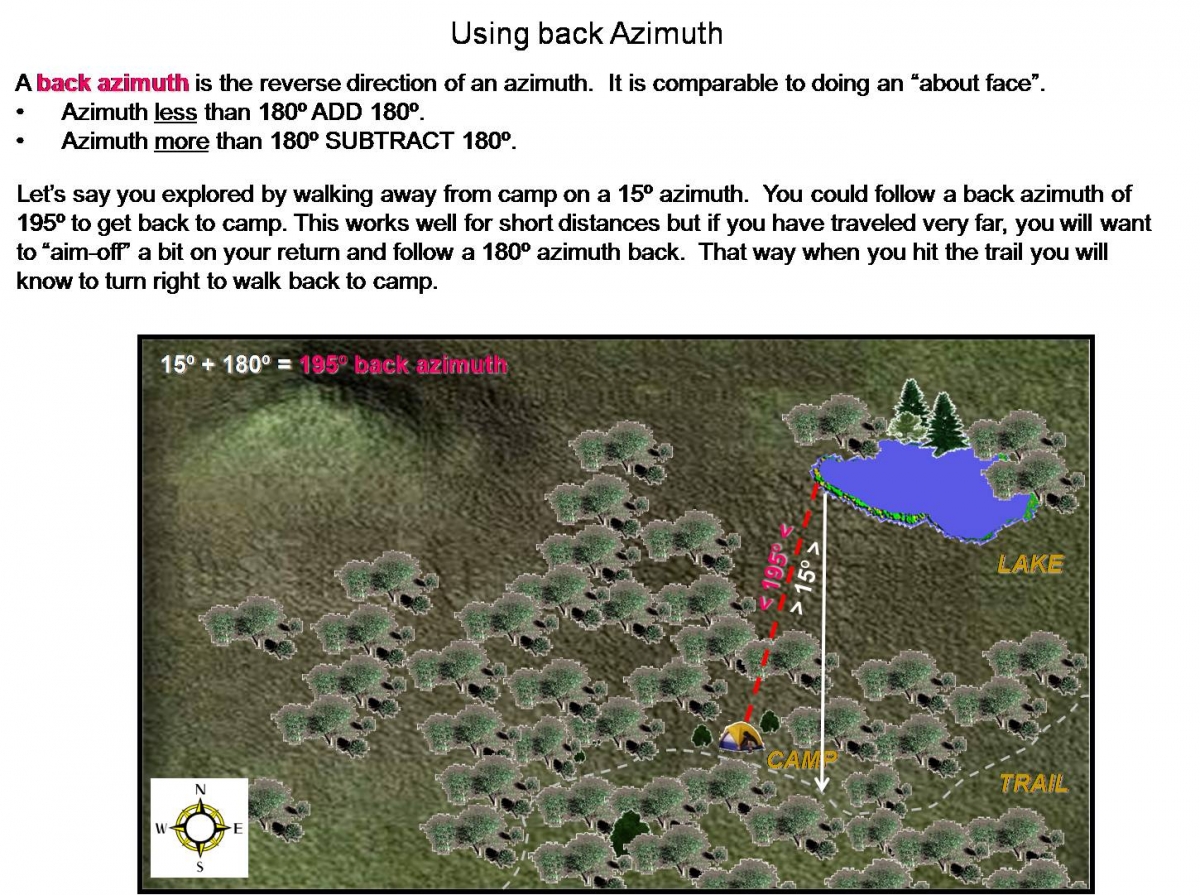
The compass provides you with the ability to stop at a location that would be very difficult to find with the map alone. It also allows you to retrace your route more accurately by using back azimuths. Both of these are illustrated below.
 |
 |
Dead Reckoning
There may be instances in which you might be forced to navigate by dead reckoning. The “dead” in dead reckoning is derived from “ded,” an abbreviation of “deduced.“It’s navigation by logical deduction.
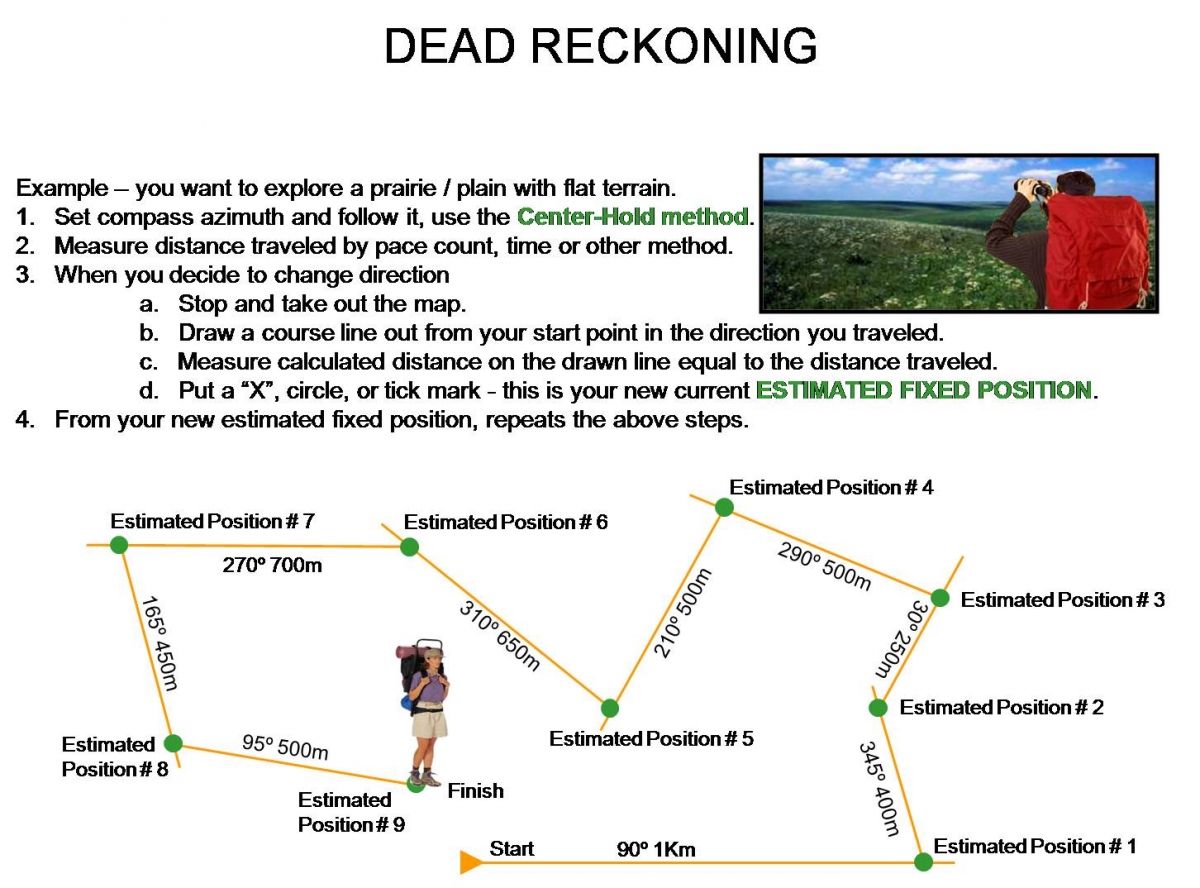 |
It is used to try to establish position in featureless terrain, foul weather or even darkness. It is not as accurate as other forms of navigation but, if it is your only option, it is better than nothing. You use direction of travel and distance traveled to keep track of your position. The more accurately you can keep track of both, the more accurate your navigation will be. An example is illustrated at right.
Watch out for lateral drift
Don’t make the mistake of thinking that because you are following a bearing on a compass, you can’t wander off course. You will need to watch out for lateral drift. It is possible to drift off course if you don’t create a baseline to follow every time you take a reading.
 |
That sums up all of the techniques for using a map and compass together to navigate. You should be ready to become the next Lewis and Clark.
Section 5: Adding a GPS unit into the mix
GPS units really are amazing tools. For a couple of hundred dollars, you can buy a handheld computer that listens to satellites and then computes your location to within a few meters anywhere on Earth. Just a few years ago, GPS units were very crude devices that allowed you to mark locations. Today they have maps, compasses, and all sorts of bells and whistles. GPS units are constantly changing. So let’s just talk about the essentials that won’t change anytime soon. I’m not going to cover many specifics in this section. If you really understand how to navigate with a map and compass, then it should be apparent how a GPS will help you navigate.
Essentials in a GPS unit
Your GPS unit needs to mark locations (where you are, where you were and where you want to go) and it would be nice if it provided a topo map with these locations. That’s it. Everything else is just extra. You should be able to get all that for a couple of hundred dollars.
Three things you need to set correctly on all GPS units.
North Reference – Somewhere in the menu system of your GPS, you can set the unit’s north reference. The options are magnetic north, true north and grid north. It doesn’t matter which one you choose as long as it is the one you want to navigate with. You just want to know which north your unit is calling north.
Coordinate System – You will find a long list of options like lat/lon or UTM. This affects how your current coordinates are displayed on the screen. I prefer UTM when I am using my GPS unit with a topo map.
Map Datum – Is the model that was used by the surveyor to relate ground features to coordinates on the map. You just want to make sure that you are using the same Datum on the GPS as the one printed on your map. Often GPS units come from the store set to the WGS 84 (World Geodetic System 1984) datum but nearly all USGS topo maps use the NAD 27 (North American Datum 1927). Your GPS unit may have a breakdown of the NAD 27 into NAD 27 CONUS (North American Datum 1927 Continental United Sates) for use in the lower 48 and NAD 27 ALASKA for use in Alaska. Select the one that is right for you. All that matters is that it matches the map you are using.
The GPS has 3 primary functions that you will use for navigation
- Display your current position (Either in coordinates or on the built in topo map)
- Mark positions (Where you are now, where you were or where you want to go)
- By telling your GPS to “GoTo” a marked position, you can identify distance and bearing to stored positions.
Displaying your current position is nice when you want to relate that to someone else. You can simply read them your coordinates. You can also look those coordinates up on your map to figure out where you are. This is much easier if you use a map tool to break up the grid on your map.
Marking positions can be done on the unit while you are in the field or at home on the computer. Most all GPS units are built to interface with your home computer. If you have mapping software on your computer, you can mark the positions on the map and then upload them to your GPS unit. You can also download positions you marked while out in the field so that you can see them in your mapping software on the computer.
You can tell your GPS unit that you want to go to a stored position and it will give you continuous updates on the straight line bearing and distance to that position. Just don’t forget that the GPS unit assumes a straight line or ‘as the crow flies’ path to the target. Just because the GPS unit is pointing you in that direction, doesn’t mean that you want to travel that direction. It is up to you to use your brain to figure out how to best get to the destination.
That’s it. Good luck and stay safe out there!